TM 9-2320-266-34
ference within the assembly indicate a defective torque con-
front band tightens. Spring tension on the servo piston
verter. Have an assistant operate the vehicle at light throttle
should release the band.
in "D" and "N" on jack stands, and listen under the trans-
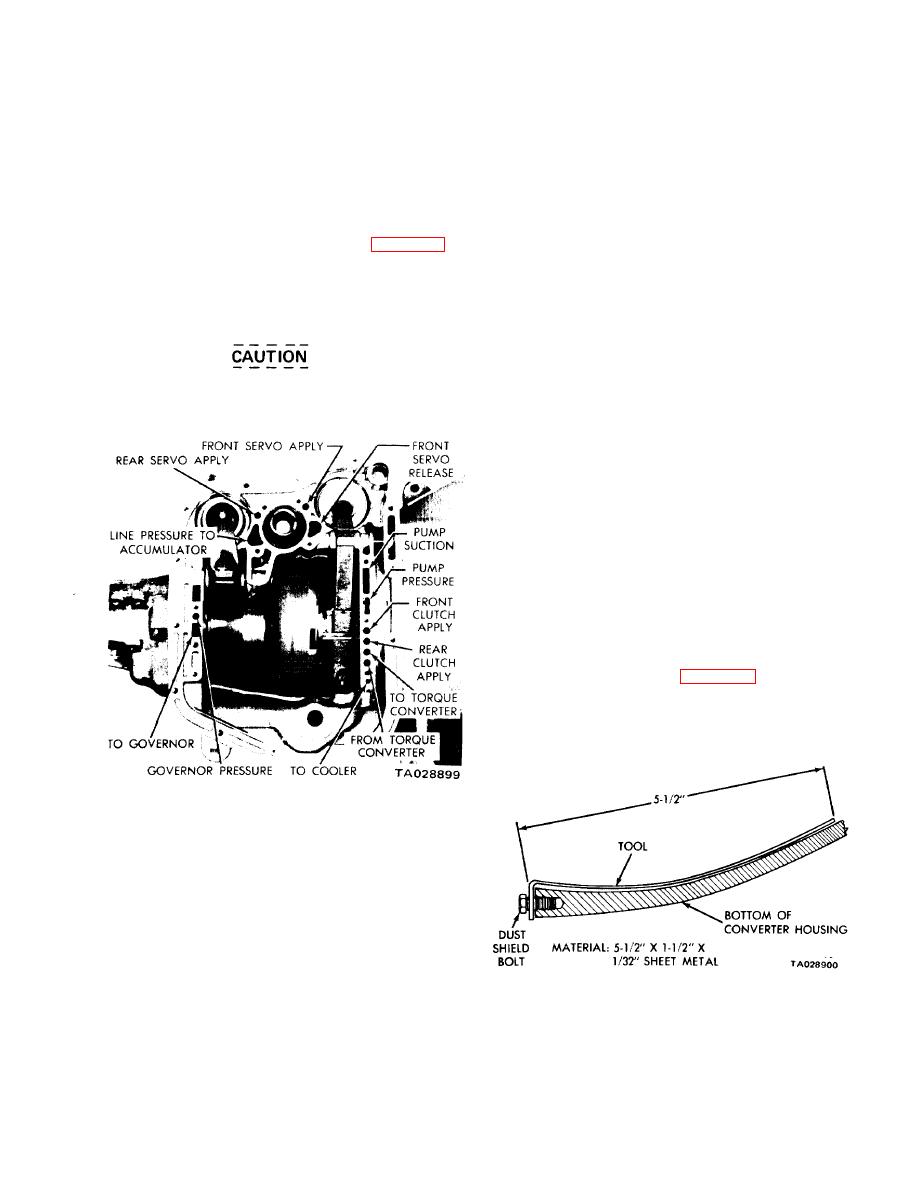
d. Low and Reverse Servo (Rear). Direct air pressure into
mission bell housing to confirm any noise originating in the
the rear servo "apply" passage. The servo is operating if the
converter.
rear band tightens. Spring tension on the servo piston should
release the band. If clutches and servos operate properly,
4-6. Clutch and Servo Air Pressure Tests.
and there is no upshift or erratic shift condition in the trans-
A "no drive" condition might exist even with correct
mission, then the valve body is malfunctioning.
fluid pressure, because of inoperative clutches or servo bands.
The inoperative units can be located through a series of tests
4-7. Fluid Leakage-Transmission Converter
which substitute air pressure for fluid pressure (figure 4-12).
Housing Area.
The front and rear clutches, kickdown servo, and the low-
a. Check for Source of Leakage. Since fluid leakage at or
reverse servo may be tested by applying air pressure to their
around the converter area may originate from an engine oil
respective passages after the valve body assembly has been
leak, examine the area closely. Transmission fluid is red and,
removed. To make air pressure tests, follow the procedures
therefore, can be distinguished from engine oil. Prior to re-
below.
moving the transmission, perform the following checks:
(1) When leakage originates from the transmission,
check the fluid level and make sure the torque converter
Compressed air supply must be free of all
drain plug is tight prior to removing the transmission and
dirt and moisture. Do not exceed 30 psi.
converter.
(2) High oil level can result in oil leaking out of the
vent located at the top of the front pump housing. If the
fluid level is high, adjust it to the proper level.
(3) Recheck for leakage. If a leak persists, perform
the following operation on the vehicle to determine whether
it is the converter or transmission that is leaking.
b. Leakage Test Probe.
(1) Remove the converter housing dust shield.
(2) Position the vehicle with the front lower than the
back, so that accumulated fluid in the converter housing will
drain out. Wipe the bottom inside of the converter housing
as dry as possible. A solvent spray followed by compressed
air drying is preferable.
(3) Fabricate a test probe (figure 4- 13) and fasten it
to a convenient dust shield bolt hole. Make certain the con-
verter is cleared by the test probe. The tool must be clean
and dry.
Figure 4-12. Air Pressure Test.
a Front Clutch. Apply air pressure to the front clutch
"apply" passage and listen for a dull thud indicating the front
clutch is operating. Hold the air pressure on for a few sec-
onds and inspect the system for excessive oil leaks.
b. Rear Clutch. Apply air pressure to the rear clutch
"apply" passage and listen for a dull thud indicating the rear
clutch is operating. Also inspect it for excessive oil leaks. If
Figure 4-13. Leak Locating Test Probe Tool.
a dull thud cannot be heard in the clutches, place your finger
tips on the clutch housing and apply air pressure again.
Movement of the piston can be felt as the clutch is applied.
(4) Run the engine at approximately 2,500 rpm with
c. Kickdown Servo (Front). Direct air pressure into the
the transmission in Neutral, for about 2 minutes. The trans-
front servo "apply" passage. The servo is operating if the
mission must be at operating temperature.
4-15


