TM 9-2320-289-20
8-10.
CONNECTING ROD REPLACEMENT.
This task covers:
a. Removal
b. Installation
INITIAL SETUP:
Materials/Parts
Tools/Test Equipment
• Two cotter pins
• Puller
• Torque wrench
a.
REMOVAL
1.
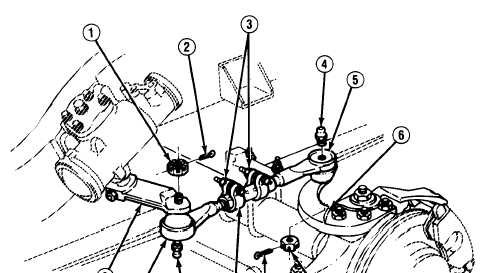
Remove 2 cotter pins (2) and nuts (1). Using puller, remove connecting rod sockets (5 and 8)
from steering arm (6) and pitman arm (9). Remove 2 grease fittings (4) if damaged. Discard
cotter pins.
2.
Inspect connecting rod sockets (5 and 8) for damage. If damaged perform step 3. If not
damaged, clean threads on connecting rod sockets.
NOTE
Note position of sleeve (7) and number of exposed threads on connecting
rod sockets (5 and 8) for installation.
3.
Loosen 2 nuts (3) and unscrew connecting rod sockets (5 and 8) from sleeve (7).
TA49731
8-20